Home Energy Management
As I've explained before, my house is quite old and has been constantly been modified over time as new technology has come along, and as the building use has changed.
One of the consequences of that constant change was me having 5 different electricity feeds, which meant 5 different meters when I bought the house. 2 were in the house, which were peak and off-peak, and 3 were in the garage, which was commercial until I bought the property.
Moving the house down to one meter was relatively easy. Moving the garage to one meter less than easy, but achievable in the end. Making it manageable from one login account was a nightmare and took months of effort and continual conversations.
Since then, I'd had an EV charger installed in the garage, and I wanted to reduce the number of meters to just a single one as I intended to, and have, put in Solar panels and thus want to connect the house and garage distribution boards. There is a sub distribution board, which is in the flat above the garage and which I rent out and so I need to charge the electricity for.
Previously I had a seperate bill for the garage, which included the flat. I was plugging in Eve Energy Smart plugs into wall sockets in the garage to work out the energy I was using, or getting the data directly from the device and then subtracting from the overall bill. However, now I'd have one bill and the majority would be mine, and thus I need to know how much power the tenant in the flat is using.
Search for a Power Management System.
As already shown in another article, I've been implementing some
Shelly relays and Shelly now have their
Shelly Pro line which really looked interesting to me.... except Shelly doesn't support HomeKit and there was not an alternative Mongoose flash. When I started looking, the devices were not supported by Homebridge, although that has changed and they are now using the
homebridge-shelly-ng plugin. I didn't really want homebridge running my distribution board (what happens if I lose power?) but considering Shelly's initial commitment to Matter I was willing to give it a go. Here in, though, is another issue in that their support for Matter is lacklustre, at best and also their modules do not support 20A per channel.
In the end, the choice was Legrand, with official HomeKit support and certification and availability.
Installation
You really need to be an electrician to do this. Legrand do not make information easy to find either, so I did employ a certified electrician and between us we worked out how it was all done. He had two main jobs:
- Connect the two distribution panels, which is outside of the scope of this post but was done by running a very thick cable from one to the other, and
- Connect up the smart connectors.
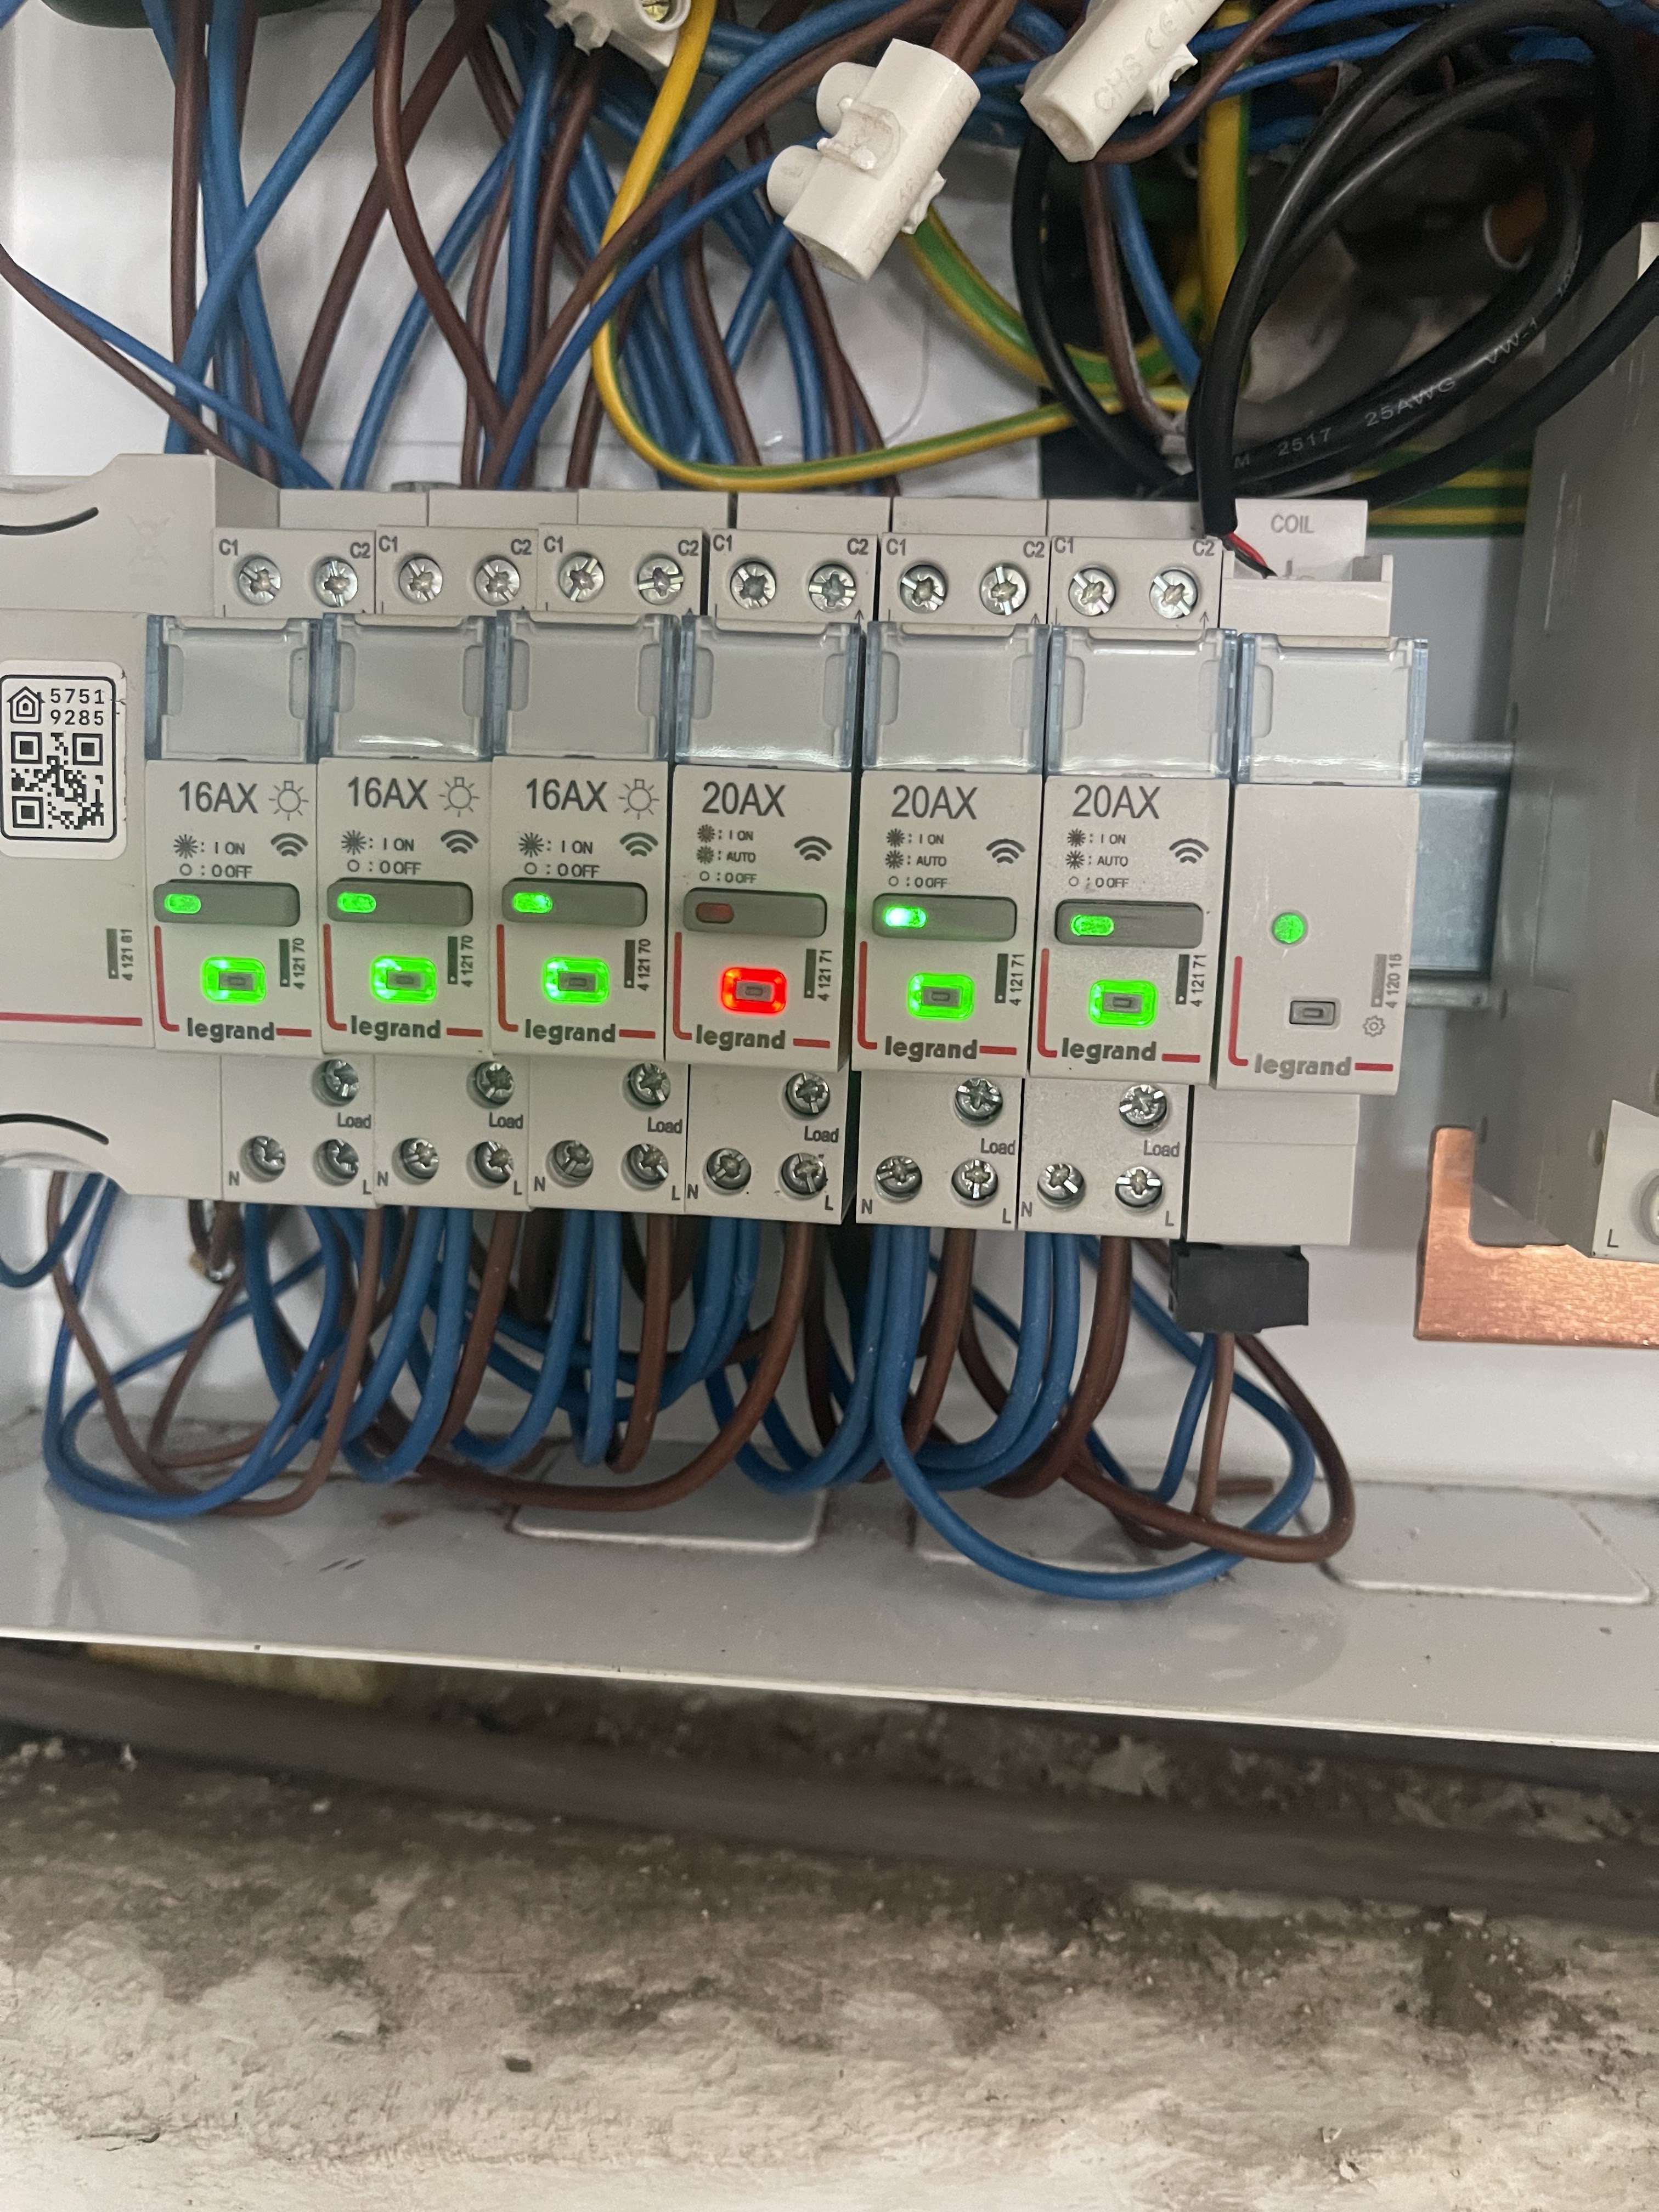
Essentially, though, the connectors sit in the circuit between the breakers and the circuit you wish to control. Once it has been done and if you've watched it, you could probably do it yourself, but I'd still suggest getting an electrician to check it over before you switch everything on. When it's all done, you end up with something like you can see above.
I couldn't control all my circuits as there is no Legrand connector for the 50A circuit or the 32A cooker circuit, but the rest are all controlled by 16A or 20A contactors. the 50A circuit goes to the flat, and is monitored by the connected electricity meter, mentioned above.
Setup the gateway controller in Apple Home.
First of all you need the App, which is called "
Home + Control". Unfortunately, it isn't available for an Apple Silicon Mac 😒
I already have a Netatmo account, so login was easy. Then it was into setup.
You will notice that at the bottom of the screen it says Europe. It defaulted to the USA so when I first did this, I was given a smaller set of options and I had to go back and then noticed it. When you change it to Europe you get a much greater range. When you go onto the 3rd screen, then you select "Gateway module".
You just start the set up, and then it wants access to your location.
Then access to your HomeKit data and then, finally you get into setting up your controller properly. First of all it I looking for a flashing green light on the controller.
You then have to get the green light to blink, seek out your HomeKit code and select your home, or create a new one.
My experience was that for some reason my phone couldn't read the QR code, so make sure you do have the user manual handy, and that the list of homes I have here is from inside the Netatmo app, not the home app. I know this as the first one in my list is my old address in California, and I've delete that from Apple Home... and haven't been able to work out how to delete it from Netatmo.
I'm guessing that if this is the first time, even though it has asked for access to your home data, you will have to create a home.
It discovers your device via it having its own WiFi, then asks if it can add it to your network and then finally asks for the set up code. Fortunately, it is actually very obviously on the front of the controller itself.... especially as I had to put it in manually.
Then you go through the normal stuff of where is it in your home and then.... in my case.... it failed to add it.
However, when I got back into setup.....
It found it, allowed me to connect to it and complete the installation. So, I wish I could show you the happy path, but at least it wasn't too painful.
Adding Devices:
Adding Sockets
The EMDX3 controller can control lights switches and sockets too. Here we are about to add 2 sockets that I had already installed in the kitchen
This is a modular system called
Arteor. It is the same all over Europe, and covers other 220-240v countries as well. The UK has some specific parts to this, such as the sockets shown, which are known as type G.
Arteor comes in various finishes:
- White Plastic, as shown
- Magnesium>
- Champagne
- Soft Aluminium
To get this socket I used an existing back box, and then a 2 gang socket (part number 5742 66) and a 2 gang face plate (part number 5712 10)
To add them to the Legrand Home+ Control App and HomeKit, I had to "add a product"
In this case, then you select "Power Outlet or Cable Outlet"
It now will show you a choice, a mobile outlet is a smart plug. Everyone else calls them smart plugs, but not Legrand. So, in this case we once more select "Power Outlet or Cable Outlet".
Now I don't understand the next bit. It seems to be assuming you are installing an entire house at once, as it tells you to turn everything off, and then the next screen tells you to go from room to room.
I turned off the circuit that controlled the sockets I wanted to add the smart connectivity to.
Now it tells you to wire your products, and then turn the power back on.
Seriously, I don't think anyone is going to start the app, and then go "Oh, I have to wire the products up?" They are going to do that first, and then start using the app... so this is where you just turn that circuit back on that you turned off before.
I do find it to be a very weird way of doing things.
When you turn the circuit on, the lights in the switches for the sockets go red.
Now you hold the button on the Gateway for about 5 secs and you will see it go solid green.
If you press the <Next> button here, and the light on the controller is not a steady green, it will fail.
Then it'll tell you to check that all the lights on everything you are adding have gone green. When they do this, they have paired with the controller so, if this next section should fail, it isn't a problem, you can go back in later and re-add the products.
When you click <next> it then goes off to find the products you have added.
And, yes, I play Star Trek Fleet Command. I am a geek after all.
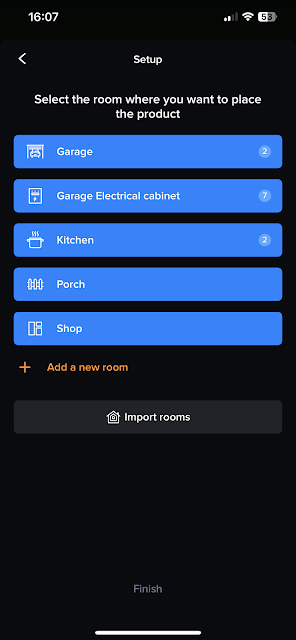
Then you are given the delight of being told you will wonder around the houses and then you get asked to select a room or add a new room. NOTE: There is a button to import rooms from Apple Home. What it shows is rooms defined in your Netatmo apps, if you have any. I didn't see that import button, so what you see next is what happened with me.
You can see that when I tried to create "Kitchen" and select it as a Room type of Kitchen it told me that it was already in my HomeKit config, so I named it as Kitchen Wall".
Now, this begs the question, if it knows that I have a room called Kitchen why not offer to import it, or to just automatically import all the rooms?
Yes, I agree, I was not being observant, but once you have agreed to give the app access to HomeKit data, isn't it then the question should be asked about importing?
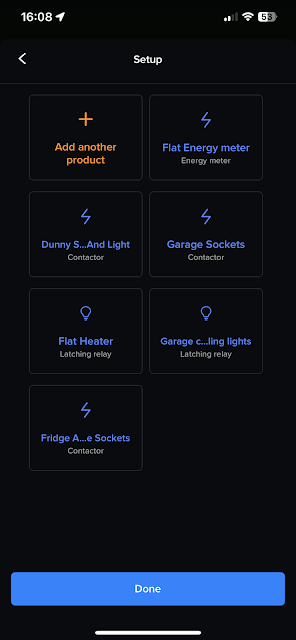
Then you get to name the device(s). I do like the "Make the product blink" button, so you are absolutely sure with what you are setting up. As you can see, I then had two devices, one for each socket.
When I went back to "Add another product", I did see the "Import Rooms" Button, and so:
I added the Kitchen from HomeKit. As you can see it then showed I had 2 devices on the Kitchen Wall, and nothing in the Kitchen. Fortunately, you can move the devices, although it isn't exactly intuitive.
From the main screen you have to:
- select the "menu" button in the top left
- then "Manage My Home"
- then the room, the the ">" on the right of the device, and then finally
- the "..." at the top right of the screen, where you can now see "Edit, Move and Delete".
Again, It'd be much easier if you could do that from the main screen where you see Rooms, which then goes down to devices, where all you can do is turn them on/off. Just add another button to go to the device settings!
Adding Contactors
These are what go inside your distribution box.
There are three types of devices you can add:
- 16A connected CX3
- 20A connected CX3
- connected electricity meter
I checked the circuits I have, and I had:
- a 50A going to the Flat, and this is what I wanted the connected electricity meter for, so I could measure most of the electricity being used by the Tenant in the flat
- 2 x 20A circuits
- 3 x 16A circuits, which had either sockets or a socket and lights
- 1 x 16A circuit for some lights.
- 1 x 32A circuit for the cooker. 32A is not covered by Legrand.
So, to me this said I needed:
- 2 x connected meter
- 2 x 20A CX3
- 4 x 16A CX3
But I was wrong. As it turned out, the way that the 16A latching relays work is that they will only show as lights, even though it can do sockets as well. Only the 20A Connected Contactor lets you define is as just about anything you want.... I have fed back to Legrand that as you can use the 16A for sockets as well that it should be possible to define that as sockets, but the answer was pretty much "It's designed for lights" and that they won't change the integration in HomeKit. So, I'm going to have to change some of the 16A to 20A. Fortunately, I could send some of the 16A back, but I have a total of 3 distribution boards in the house, so they'll get used.
What you will see next is me replacing one of the 16A Latching Relays with a 20A Connected Contactor.
Setup
This time, after some experience, I did manage to follow the app and get the contactor set up as suggested.
As before, you select the drop down menu, "+ Add product", select "Legrand" and then "Electrical panel Modules".
Again, you select "Electrical Panel modules" and you sort of follow instructions. You certainly turn off all the power, and this would be where you install the actual contactor. Then you turn the power back on, however, you ignore the "Restart all products at the same time....", here. As...
You then get this screen that tells you to wire the devices.
Then I put on the main breaker, but I turned off the breaker that controlled the circuit I had just replaced. Then did as suggested in the screen, in terms of waiting for the Gateway module to connect to the WiFi,
Then you press the button, shown in dark grey here, for 5 secs, and then the light goes solid green. If this light is already solid green, do not press it again as that will put the unit into reset mode.
Note: Do NOT press the <next> button just yet.
What I saw, then, was this. Which show the gateway module in pairing mode, but you can see the 20A contactor is off.
I then switched on the breaker for the circuit, and the contactor light went red.
Then, after a minute or so, it goes green. This means that it has paired with the gateway module. If after about 3 minutes it doesn't do it, turn off the breaker again, and then turn it on again. I never had to try more than twice.
It is at this point that you press the <NEXT> button in the app.
The app then searches for new products and when it finds them, it then tells you to add them into the app.
<
You the select the room, or import another room from HomeKit. In my case, I'm adding this to the Garage Electrical cabinet.
It then asks you to "Add another product" again, which seems a little bizarre..except when you realise this is designed to add multiple products at the same time in the same room. So, you select "Add another product"...
It then tells you to press a button, which is in the middle of the connector. As soon as you do that, you will go to the next screen and you will see that there is now a "Contactor 1". You are not quite finished.
You have to name it and you can select what kind of a device it is. In my case, it is an Immersion Heater. When you have done that, you return to the setup and you can see it.
You'd think you were done now.... but no!
If you are not using peak/off peak electricity, or you do not want that circuit impacted by that, then you need to go into the setup for the device and change it to "Control on/off" or otherwise it will automatically shut off during peak timings.
And it magically appears in HomeKit, in the correct room!
To stop accidental switching off of circuits, I've created 2 hidden rooms for the distribution panels.
You can see that the immersion heater is off. The way we control it is via an automation and the physical switch in the kitchen.
As can be seen here, the Immersion heater contact breaker switches on at 05:00 every morning. It is also switched off at 07:00 as this is when off-peak finishes. All we have to do is have the physical switch turned on the night before. I'd love to make the physical switch smart, and have been holding out for a 20A Apple Home switch, but there doesn't seem to be one, or even one that supports Matter.
So what? What do I get from this? What do I actually think?
Even my electrician is asking me why I want to do this. He gets that I need to measure the power going to the flat, which is measuring the 50A circuit, and also a heater in the attic.... but why the rest?
Well, I'm starting to get to see what things are costing me, and my tenant. I can see at a circuit level, or at an individual socket level. I've not tried the light switches yet, so I'm yet to see that.
From my iPhone, I can see what the Flat is using, and then go into "Appliances" and see what else is going on.
If I then go further down. into "Other Appliances", I can now see individual sockets and the socket circuits, which includes the heater in the flat.
As you can see, I have the option of showing in kWh or in currency. To get the "cost" this has to be done in settings. I don't really use it as our electricity charges are changing too frequently, and I see no automatic way of updating it. However, I have updated when I have changed contracts so it reflects on/off-peak, which you can see in the below graph.
I can't download any data from here but if you go to settings/Data Management, or the mobile app, you can.
You get to select the data polling rate, and start and end dates as well as the file format (csv or xls), and this exports a data file for you.
Sound good, eh? No!
It is fairly unintelligible as the columns in the spreadsheet are not named for humans, although the information is split into peak and off-peak. It does give me the total of the 2 power lines, which is not what I want. What I want to see is the various columns for what I can see on the screen. A good start would be at least split by power lines. So, in this case, I should see 4 columns. One for the Flat meter and the other for the rest of the home. When I select appliances, I should be able to see all of my appliances. Again, when I drill down further into "Other Appliances".
You get none of this, so the download is as much use as a chocolate tea pot!
If you go back to the graph, and you click on every day, then you do see each appliance change per day, so the app does have the information. It's just not well presented at all. It doesn't even change the graph, so I can't see what was used peak or off peak.
At the moment, I'll have to add the info to a spreadsheet manually to calculate what my tenant owes me.
There is one nice new feature that has been implemented since I first bought the system, which is the ability to do a comparison.
Here, you can se the months of November 2024 and October 2024 being compared.
When I look at energy consumption of November 2023 to November 2024, I can see there has been a significant increase which is great.... but because the graph does not allow me to drill down, I can't see why. I can't tell if it is me or the flat Tennant who has significantly increased their usage.
Because of where this is installed, I also can't see my solar or my car charger.
Seriously, this has not been designed by someone who has the faintest clue on how to design a UI, or any serious use case in terms of reporting on electricity usage.
Legrand, if you actually read this, I'll be more than happy to help you build a much better UI.
Where did I go from here?
I gave up on the Legrand UI. It isn't worth the effort, although I check in every now and then.
I needed something that really gave me the info I needed, in a way that was useful, and it all began when I implemented solar power with a house battery in May of 2023.... but that's the subject of
part 2.


 <
<


Comments
Post a Comment