When I first bought the house, quite a bit of it had wiring that was "no up to code". Indeed, so "not up to code" that it is what the US calls knob-and-tube. Over the few years we've owned the house, we've been steadily upgrading the wiring and the outlets. This seemed like the perfect opportunity to change the outlets to smart ones and, as it happens, the iDevices Smart Wall Outlet was released just before we purchased the house. It was, fairly much, the only option in 2017 as well... at least for HomeKit, and it supports Amazon Alexa as well as Google Home.
Smart Outlet or Smart Plug?
I think the choice is quite simple. It comes down to three things really?
- Aesthetics
- Functionality
- Flexibility
- Price
Ok four things!
Let's take the easy one first.
Price
The iDevices Wall Outlet can be between $65 and $92, depending on what time of year you buy it. I just bought another one (Jan 2021) in their year end sale for $65.
Two Smart Plugs will cost you anywhere from $20 for 2 (
Vocolinc) to $170 for 2 (
Eve Energy). That's quite a broad spectrum. I did a more complete comparison of Smart Plugs in an
earlier post - Vocolinc and Eve came out as my favourites.
Aesthetic
As far as I'm concerned, you can't go past just a smart wall socket as far as the aesthetic is concerned. It's sits fairly flush to the wall, so things do not stick too far out.
Flexibility
This is where the Smart Plug wins and it is why I have a few of them dotted around. You may want an individual implementation for something. For me, it was to bring a degree of smart capability to a battery backup UPS.
Functionality
This really gets down to the manufacturer and it also explains why, to an extent, the devices are at their particular price points.
WiFi/Bluetooth/Thread
iDevices support 2.4ghz and 5ghz bands. Vocolinc does not. I must admit, in my case this has occasionally made Vocolinc a pain to set up. But this is part of the price difference. The 5ghz chip set is more expensive than the 2.4ghz chipset.
Eve supports Bluetooth Low Energy and will, soon, also support Thread via a firmware upgrade... at least for the European versions. We are yet to hear about the US version. Thread, which also comes as part of the HomePod mini seems to provide an excellent IoT mesh and so, with Eve, you'll be extending your mesh and will improve the overall coverage of that mesh. Not so important right now, as not many vendors support it, but as time moves on I think we'll see more.
Power Monitoring
Both Eve and iDevices have power monitoring capabilities and gather information. With Eve you can export that data, where with iDevices it can only be seen in the app. This data is not exposed by the HomeKit app so has to come from the individual applications and seems to be vendor specific.
Scheduling
All 3 options can schedule certain times to switch on/off. Here I think Eve wins as their UI is actually a very good UI into the whole of HomeKit, not just their own devices.
Summary
If you are replacing your power outlets anyway, then I think the iDevices Wall outlet is the way to go, especially if you care about aesthetics. If you can, wait for their special offers. It can make quite a difference in overall cost if you are deploying a large number.
If you care about price, flexibility or other functionality, such as Thread, then you may want to go with a Smart Plug.
Implementing iDevices Smart Wall Outlet
The Smart Wall Outlet has two separately addressable power outlets and a night light, which you can change colour and brilliance. Personally, though, I've never used any of the night lights at all. Just never found a use for them.
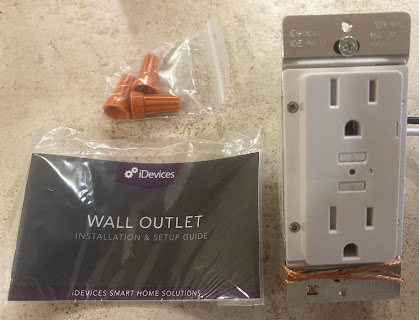
It comes in a box only slightly larger than the wall outlet itself. That Outlet has 3 wires attached, one of which is the ground.
There's an instruction manual, which isn't really needed, and some wire twist-on connectors which horrified me when I first saw them but seem to be completely standard in the USA.
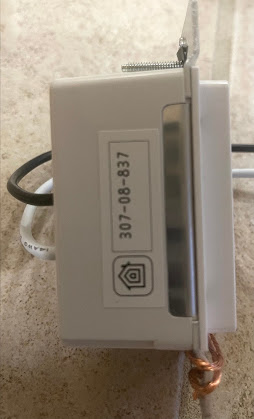
The device has the HomeKit code on the side but, I must admit my favourite is that it has a little semaphore that comes out of the side at the front with the HomeKit code on it as well. Just in case.
A couple of the other things I like about the iDevices wall sockets:
- There are little buttons on either Sid eof the night light. These are on/off switches for that particular outlet.
- There is a small indentation just to the right of the night light. This is the reset switch. However, if you just push it in and don't keep it in it resets WiFi for those weird times when things don't quite connect properly (especially after a power outage... yes PG&E I'm looking at you!)
Installation
Turn off the power at the breaker first! It may not kill you, but it'll bloody well hurt if you shock yourself!
I did say I lived in an old house, and here is the delightful wall outlet that I had in place before I replaced it.
I removed the wall outlet, and discovered that I still had Knob & Tube behind it. Whilst not to code, it is still perfectly usable.
So I connect the two wires that are in the outlet to the two wires that were in the wall. What is missing is that the switch also has a ground wire. I ran a ground wire in my basement and brought it up into the outlet as well.
At this point, I suggest that you actually switch the breaker back on, before you put the new outlet into the wall. The reason being is that it is just a pain to go through everything if it doesn't work, just to have to take it off the wall again.
When you add the power, the night light LED in the centre of the outlet pulses Blue. This means it is in pairing mode.
You can now add it to HomeKit. You can do this directly from the Home app if you wish. This means that the iDevices app is not necessary at this point.
HomeKit will now show the UI to add an accessory. Hey you can see that I'm using the HomeKit code that is on the side of the outlet.
When it has read the code, it connects to the accessory, asks the name of the wall outlet and then it asks you for the room it is in.
It is rather a shame that it does not default to the room you currently have on the screen, so this is a necessary step.
Lastly it asks you for the names of the outlets. By default , this is Outlet A and Outlet B. To me that doesn't really mean anything, so I call them Top & Bottom.
The switch is then added to your home.
As usual, the accessory appears on the Home Screen. If you don't want that, you must remove it from favourites. I really wish there was a way to override the default behaviour.
You may notice that there is an icon in the top right hand corner of the button. This means that a. firmware update is available. Now you must use the iDevices app.
In the top right hand corner of the app, you can see a triangular icon with an exclamation mark. This is notifications. In this case, selecting it will enable you to update the firmware.
When that's done, and everything is working correctly, switch off your circuit breaker again, install the outlet into the wall, install the surround, and turn on the circuit breaker. All done! The LED will be on, and this is the Night Light. Turn it off if you wish.
Power Usage
the iDevices Power usage is not as sophisticated as the Eve Energy Smart Plug, but it still gives some useful information.
By default it uses a US standard rate, but if you tell the app your location it will narrow down some more. For me, it showed California and when I checked against PG&E it was woefully out, so I had to create my own rate of $0.25/KWh
You get 5 views, based on time:
But you can't decide what is in your view and there is no graph.
You can select an individual device, if you wish, and that will even tell you what it is consuming at that moment.
Not too surprisingly, my fridge is a major power consumer, as is our kettle.


Comments
Post a Comment