This is not a tutorial on how to physically connect Nest.... If you want to do that, there's plenty of videos out there. This is how to connect them to HomeKit, via Homebridge.
To a certain extent, this is a tale of thinking about what you want to do before you do anything.... for me it really shows how confusing the home automation market can be, because my friend is a tech savvy. So if he can fall into the trap of buying based on manufacturing promises, any one can.
It is also a tale of how Homebridge can help you get out of trouble, and also what the long term prospects are.
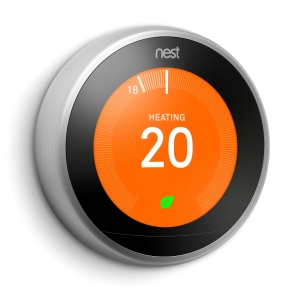 |
| Google Nest Learning Thermostat |
I've known my friends for over a decade now. Funnily enough we are both originally from the UK, but we first met in Australia and we are both back in the UK now with both of us having lived in other countries in-between. Through it all, we have maintained contact and he and his wife move back to the UK about 2 years before us.
They bought a house which they are now retro-fitting with various Smart Accessories, but without a clear plan as to approach. One evening, we were chatting and I was quite surprised that he wasn't taking his professional tech experience and applying it to his smart home implementation.... then again, I'm not exactly blameless in this respect, but I did start off with deciding on a platform.
Like us, my friends are pretty much orientated towards Apple products using Mac's and iPhones. They've even had tv's since V2. So, it made sense to base their home on HomeKit.... yet they had invested in Google Nest Cameras and Learning Thermostats as well as some tp-Link smart bulbs, but only 2 of those, because they were cheap. The Google Nest equipment was because of functionality, but there was no thought about really being Smart, it was more about Remote Control.
The house has 5 zones. 4 underfloor heating zones downstairs, and 1 zone upstairs using radiators. Currently the dinning/kitchen zone and upstairs zones are connected to Nest Learning thermostats, and they've bought 2 more to be implemented.
They also have 2 Cameras. One covering the back garden, and one covering the Entrance Hall.
Nest Learning Thermostat
It's quite different from the Thermostat I deployed whilst I was in the USA. To start with, in the USA my whole home was treated like a single zone.... mainly because I was still operating with the original heating system for the house, from 1916!
The Nest system has a sender, the Thermostat, and a receiver, the Heat Link, which connect to each other via Thread.... not too surprisingly as Nest was one of the original developers behind Thread in 2014.
Basically the Thermostat reads the temperature in the room/zone and then tells the heat link to open/close the valves to get the desired temperature in the house.
Installing the Nest Module(s)
In this case we have to install two Nest modules to Homebridge. One for the Nest Thermostat, and one for the Nest Cams.
 |
| Screen shot from Homebridge UI showing the two Nest plugins needed. |
These are:
- Homebridge Nest and
- Homebridge Nest Cam
When you install each one, they go straight into settings, but setup is quite complex, so I just cancelled out of each one and will set up each afterwards.
Nest Thermostat Setup.
This supports both Nest and Google login setups, but Nest login is deprecated so I advise using the Google login.
Now, I think it is a good assumption that you are using an Apple device. So, be warned that you will have to use Google Chrome to perform the setup.
The steps are on the Github page for the plugin, but it can be quite hard to follow. It may seem to be redundant, but I'm going to do it again here, using graphics, which should make it much easier.
The Nest setup only requires 2 fields, which are:
Getting them is not so easy.
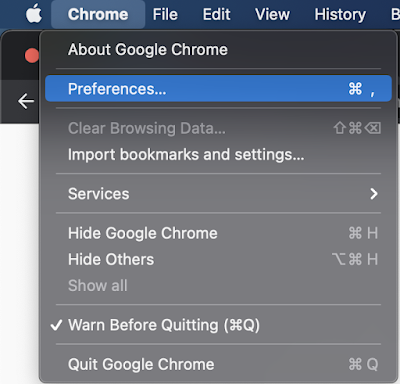
Fire up Chrome.
The instructions on the wiki tell you to go into Incognito mode, but first of all you need to make sure you enable all cookies.
- On the Chrome Tab, select Preferences
- This opens a new window, and select "Privacy and security"
- On the right, select "Allow all cookies"
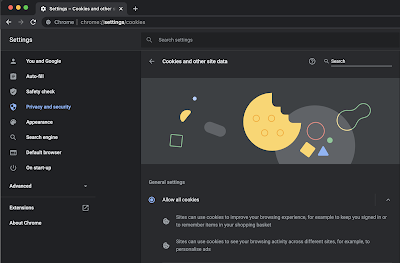
- Close the window
If you don't do this, you will go through a number of steps and when you log in, you will see:
Now go into Incognito mode. <file><new Incognito Window>
A new browser window will open.
Open Developer Tools <View><Developer><Developer Tools>
A side window will appear, probably to the right.
Click on the <Network> tab and make sure that <preserve log> is selected.
In the filter field type "issueToken"
In the browser window, type "home.nest.com" and sign in with your google account.
Now, move your concentration back to the developers tools to the side, and in the network tab you should see a network call beginning with "iframerpc", This is your issueToken for your homebridge config.
Click on this, and it will now show the token.
Select the information, and copy the value <right click> or <command><c>
Paste it into the issueToken field in the settings on the plugin. Make sure it starts with "https://accounts.google.com", and ends with "nest.com"
Go back to the incognito window in Chrome. In the filter field, type "oauth2/iframe"
several network calls will appear, you are interested in the last one that says iframe.
Select that, and a great deal of text will appear on the right hand side. Look for the Headers Tab, and under Request Headers you will see cookies. You will probably have to scroll down and you select and copy the value again. You do not need the word cookies.
You paste that into the "Cookies" field in the plugin setting, and save the settings.
Restart Homebridge, and if you look in Accessories you should see:
You should now be able to add the accessories to HomeKit as normal.
You can set the cookies back to blocked in Chrome preferences and close the incognito window, or Chrome completely.
Nest Cam
This is much easier than the Nest thermostats.
You click on the settings link on the plugin, and you get a screen telling you to login.
You actually click on where it says "Here". This will take you to a Nest Login Page, and you login with your Google account.
Then you have to allow Nest to access your google account.
You may get another window if you have 2 factor authentication switched on.
You copy the code, and insert it into the token field in the homebridge plugin settings.
Then click on <Login> and Save the settings.
Restart Homebridge, and your cameras will now appear in the Homebridge accessories. You can now add them to HomeKit.
Now you will get a delay in any video as what is happening is that the video is being sent to Google Cloud, and then Homebridge is getting it from Google Cloud and sending it to HomeKit. I've found the turn around time is about 2seconds.
So, where to now?
Well, hopefully we'll see the Thermostats appear in Matter in 2022, as in May 2021 Google committed to supporting Matter and specifically named its thermostats.
Cameras will not support Matter in 2022. It has already been stated that Cameras were in the too hard basket, so we'll have to wait longer to se that done... and who knows what specific cameras will be supported.
Still, over time, we should be able to remove the Nest plugins from Homebridge.


You are brilliant !! Thanks for sharing this, I am not an expert and have been struggling with setting up my nest products with apple homekit / homebridge and the github was extremely confusing. I had given up hope until I stumbled upon your article and it WORKED. Now I have the nest cameras and thermostat set up in Apple Home! THANK YOU
ReplyDeleteWhat an excellent tutorial, thank you for taking the time to share your expertise in such a clear way. I have just got my first Apple Watch and have been trying to work out how to control my Google-based home. I (fortunately) stumbled across Homebridge and had it merrily running on one of my Raspberry Pis, but the Token settings in the Nest Plugin had me stumped, until I found this. Now, fingers crossed for a Plugin for the new cameras!
ReplyDelete