A night at the outdoor movies
As I've said, I live in the Bay Area of California. So terrible weather isn't really an issue.. except when it gets really hot. It does rain here, but from October(If you are lucky) through to March and even then it isn't much or even that heavy. I must admit, it's kind of funny having grown up in the UK, I now miss rain!
Anyway, the combination of weather, Covid-19, having a very small social bubble and a large number of movies in my collection has meant that I have created an outdoor movie theatre at my house, on the front of my Garage.
I bought the following:
- 100"/2.54m Elite Screens Eelectric100H with AcusticPro HD Screen Material
- XGIMI H2 Projector
- HyperDrive USB-C Hub for iPad Pro
- 2nd HomePod to create Stereo Pair.
- 2 Black Sesame HomePod Stands
- Broadlink RM Pro (Admittedly, mine is the older one V3. I had it lying around from other projects)
Projector
Issues
Displaying through the projector
Still.....
Sound
Screen
Wiring up the Projector screen outdoors.
I already had an outdoors outlet in the garage wall, so it was just a question of extending the conduit further up the wall and installing another socket about half way up the garage door opening. From that I installed an idevices outdoor outlet and plugged the screen into one of the outlets, so I can turn it off when not being used.
Automation
{"platform": "BroadlinkRM","name": "Broadlink RM","hideWelcomeMessage": true,"hosts": [{"address": "192.168.1.247","mac": "34:ea:34:89:13:5a","isRFSupported": true}],"accessories": [{"name": "Screen","type": "window-covering","totalDurationClose": 16,"totalDurationOpen": 15,"sendStopAt100": true,"data": {"open": "260084002a0f290f290f290f0f291027112711271027290f102811261127290f1028290f290f2a0e290f10272a0e290f290f10282a0e290f0f281028290f10270e2a290003ce2a0e290f290f290f10281027102810281027290f102811261127290f1028290f2a0e2a0e2a0e0e29290f2a0e2a0e0f29290f2a0e0e291127290f1028102729000d0500000000","close": "2600c6002a0f2810281028100f290f290e290f290f280f2928100f290e2928100f292810281028100e292810281028100f29281028100f2928100e2928100f290e29280003cf28112711271028100f290f290e290f290f290e2928100f290e2928100f292810281028100e2a2711280f28100f29281028100f2928100e2928100f290f28280003d028102810281027110f280f290e290f290f290e2928100f290f2828100f292810281028100f292810281028100e29281028100f2928100e2928100f290f2829000d050000","stop": "2600c6002a0f290f290f290f0e291028102710280f290f28102828100e2928100f292810281028100f290e29281028100f2a0e290e2928102810281028100e2a0e290f0003e828102810281028100e2a0e290f290e290f290f290e2928100f2928100e2928112810280f0f290f29281028100e290f290f292711280f290f28100f290f290e0003e82810290f281028100f290f280f290f290f280f290f2928100e2928100f292810281028100e290f29281028100e2a0e290f2928102810281028100e290f290f000d050000"}}]}
To give some context to this, it is not always required to give the MAC address and the IP address. The plugin will try to find the Broadlink. However, in my case it did not, so I had to find them from my networker router. Also, because it couldn't find them, I defined it as a permanent address in my DHCP table.
The next line "isRFSupported" was set to true because that is the communication method with the screen.
Next is the actual screen itself, which I imaginatively called screen. In HomeKit, I've since changed it to "projector screen". I've created it as a window covering.
"totalDurationClose" is how many seconds it takes to Close the screen (Go up in the case of a projector screen)
"totalDurationOpen" is how many seconds it takes to Open the screen (Go down). Now this is not how many seconds to all the way down, but to where you want it to stop. For my screen that was about 95% of the way down.
"sendStopAt100" is set to true because that is saying to send the stop command at 15 seconds, the value defined in "totalDurationOpen" and not let the screen open 100% of its capability. If you do want it to go to 100% of its capability, set this to false.
The next 3 items are actually the RF codes that need to be sent to the screen. The way you get those is to use the Broadlink app and the actual remote control and learn the codes. They actually appear in the status log for Homebridge and you cut and paste, making it much less daunting. I'd advise doing them one at a time, as otherwise it can become quite confusing.
Above is the relevant section of HomeKit.
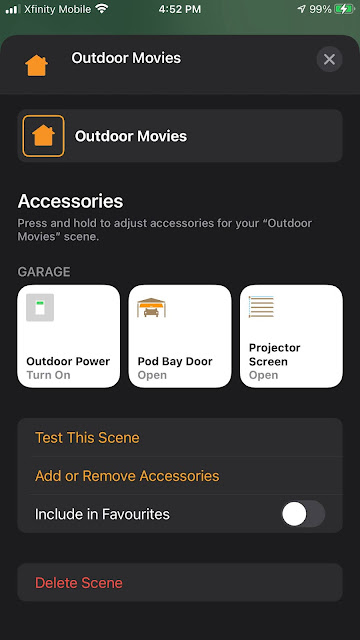
I have 2 scenes, on of which is a favourite, and is what I use to make sure all doors are bolted and the garage door is closed at night, that being called "Good Night".
The other is called "Outdoor Movies", and when I click it, or say it with Siri, I get:
- Turns the power on for the outdoor outlet
- Opens the Garage Door
- Opens the Projector Screen
What I'd do differently with money as no object
- A short throw 4K projector that I could integrate with HomeKit. Possibly the LG 4K Short throw, which runs WebOS and so could probably at least use the homebridge plugin.
- Rear projection screen, so I could've had the projector permanently mounted inside the garage, and, as already said,
- Sonos Outdoor Speakers with a HomePod mini
- tv, but I'm going to wait for the long awaited one.


Comments
Post a Comment