Keeping the house cooler by Automating the use of Blinds and modifying the Ikea Fyrtur blackout roller blind.
Just as a reminder, I live in an architect designed Californian Prairie house, built in 1916. I am restricted, to an extent, about what I can do to the house but I actually want to be faithful to it, which means not too many changes.
Essentially, I have 3 methods to keep the house cool, other than opening windows to increase airflow - which is not possible during wild fire season due to the smoke in the air. This is the first method.
Automatic Blinds
Ikea Fyrtur
I guess my first 2 comments would be:
- Why can't Ikea give their products names that everyone else can pronounce? Given that not so many people speak Swedish, and
- During Covid-19 I got to realise how dismal Ikea's online mail ordering process is. They really need to pick up their game here. I ended up having to try for multiple days and had to order in 3 lots for the 3 different sizes I needed as well wait for many many weeks for them to be delivered. Ikea, if you are reading this, hire someone from Amazon!

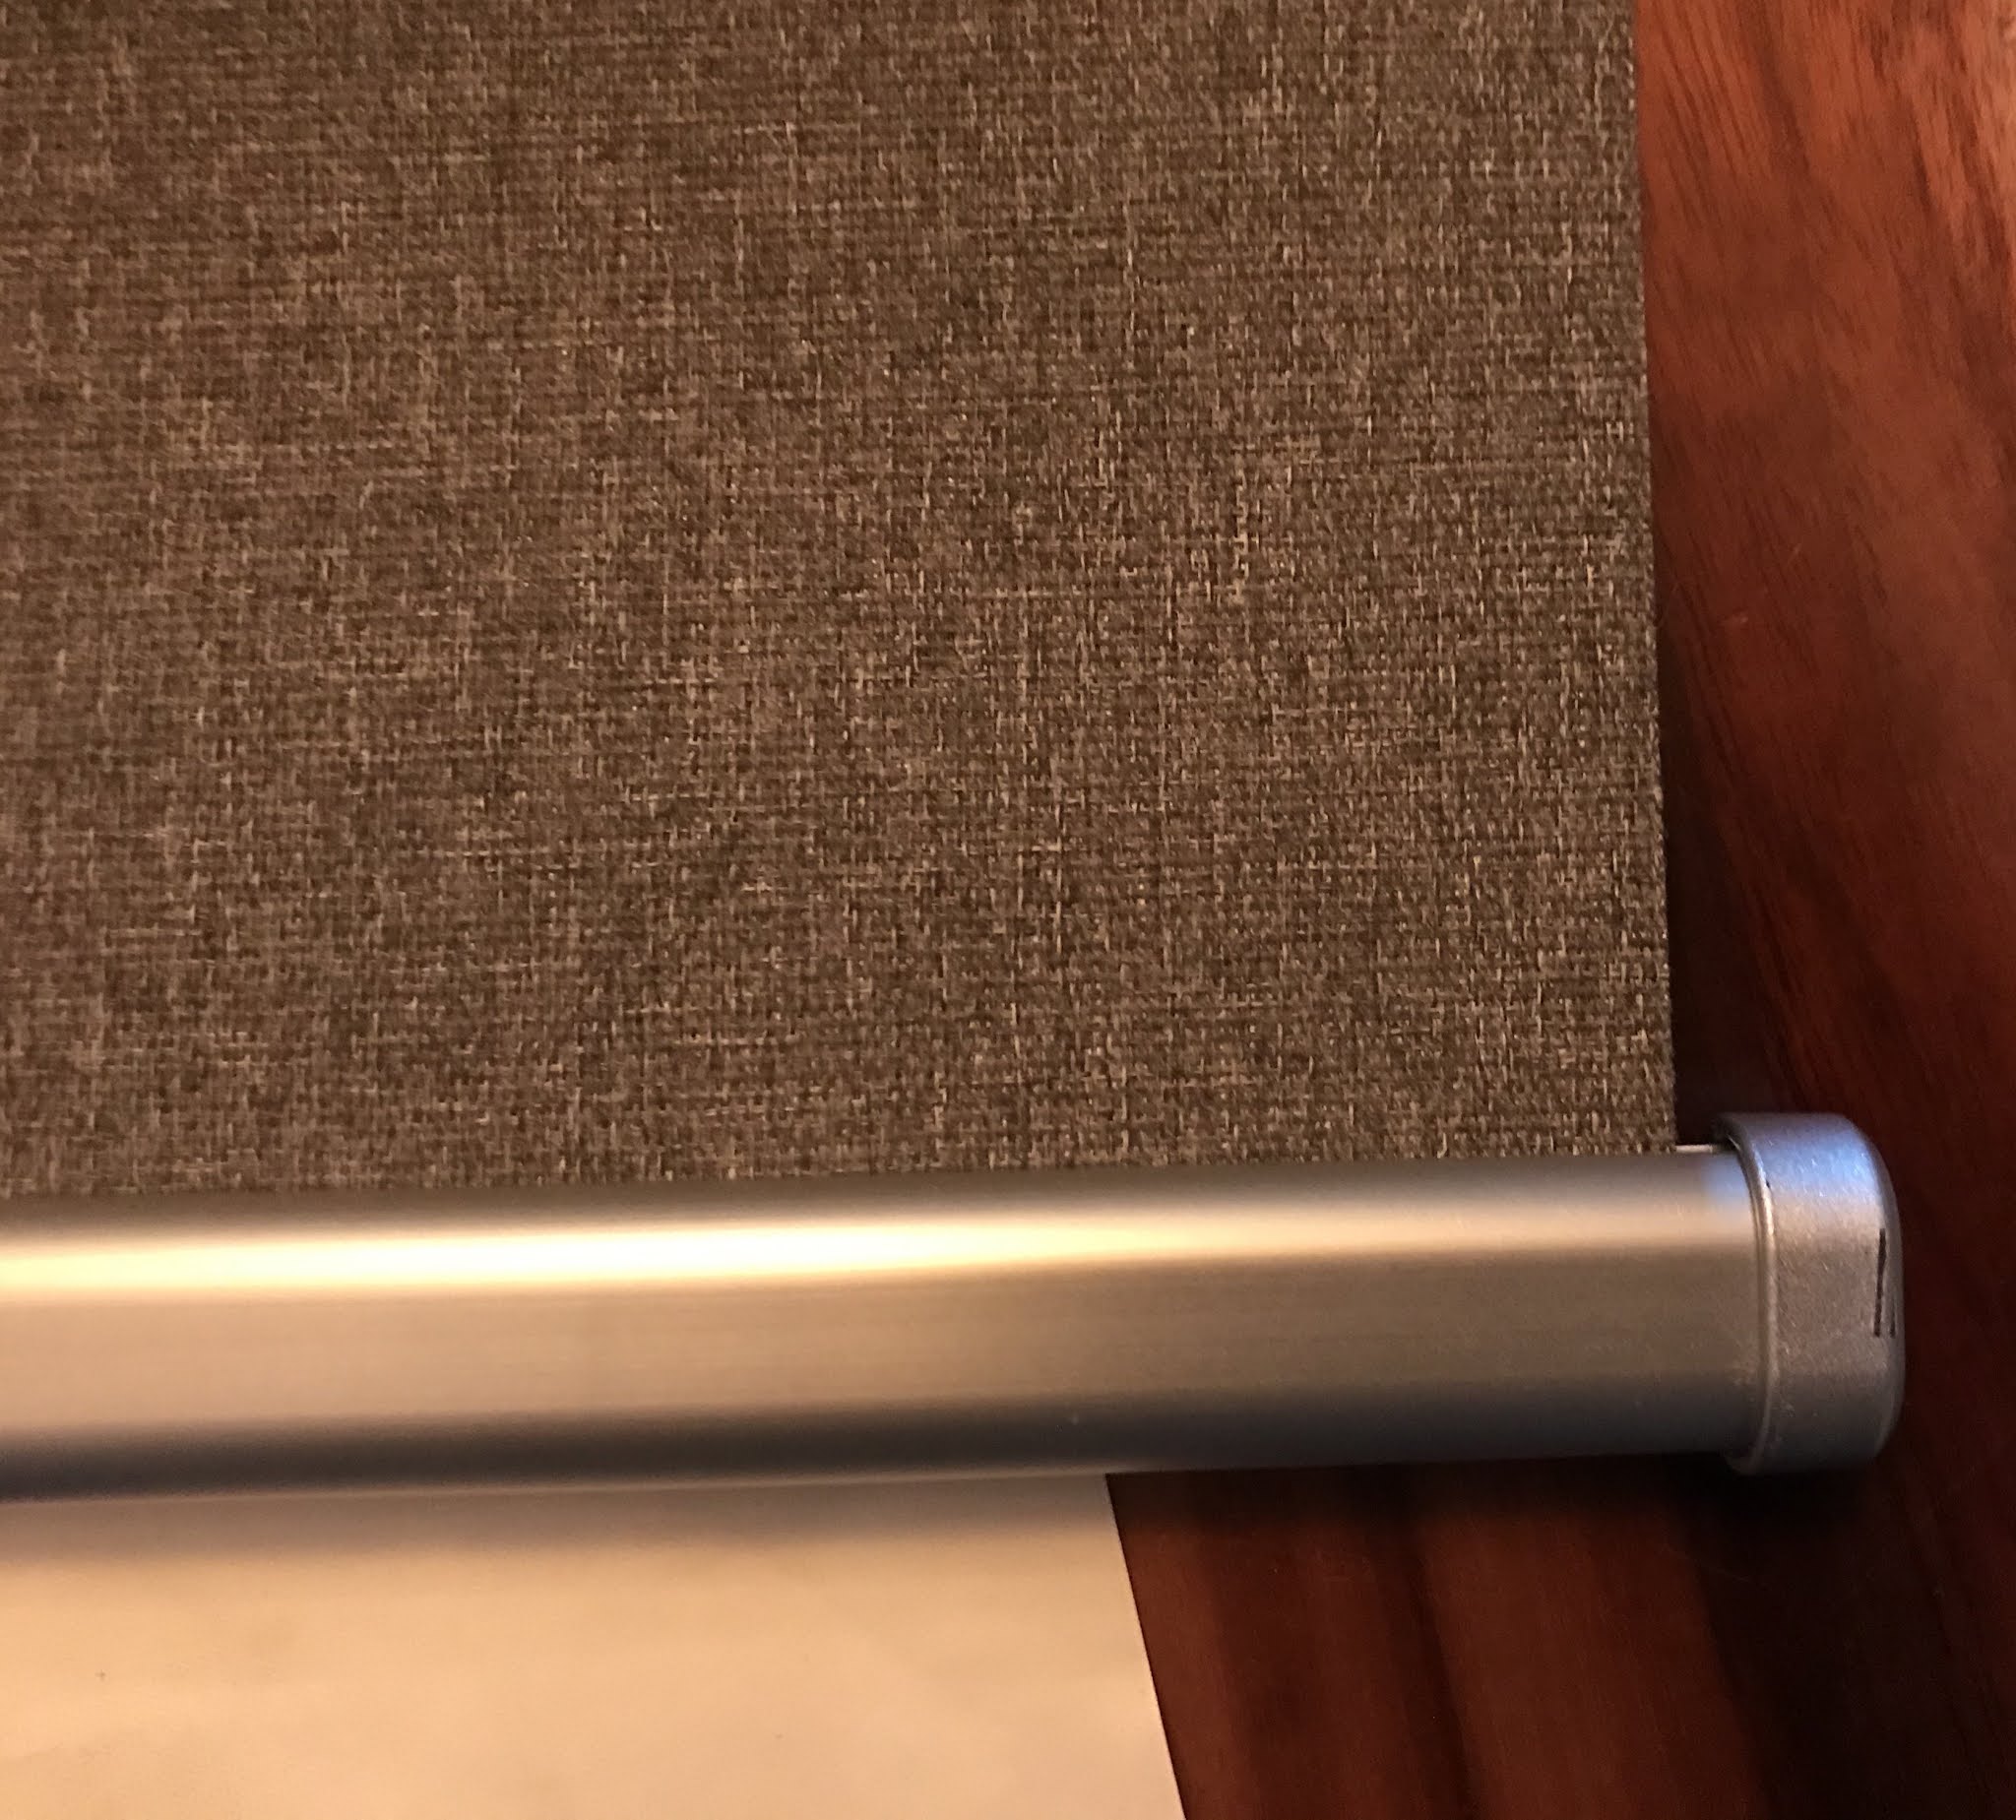
This is the main window into the Dining Room, which is on the South Side of the house, basically how most of the sun gets into the house.
You can also see the GE Appliances Window Air Conditioning Unit, but I'll cover that later.
You may be wondering why I didn't put a blind on the top window, and the answer is that, despite appearances, during the summer months, by the time the sun starts to shine through the southern facing windows, it is high enough in the sky that that top window is in shade.
There are 3 Windows. The two outside ones are approximately the same size. Center one obviously much larger. These blinds come in a standard length of 76"/1.93m. Fortunately, you can define the stop point for these blinds.


Here you can see a closeup of the installation in the window and with the blind actually down. It actually does a pretty good job of blocking out the sun. You can see the compartment for the battery in the top left. This is a rechargeable battery. So far, I'd say the lifetime of that battery is excellent, but it would've been nice to have a solar power option.
One comment I'd make is that I wish it were possible, and supported, to switch the blind around and make it roll the opposite way around. This would've meant I could've pushed the blinds further into the window frames as the fabric would drop down on the outside. I think it would've been more aesthetically pleasing.
You may notice, as well, that my blinds go right up to the width of the window. I wasn't lucky here, I modified the blind. It does break my guarantee, but I'm not too worried about it.
Modifying Ikea Fyrtur

Essentially the Fyrtur is made of 3 parts. The housing, that contains the Battery box, the intelligence (Which is actually a tiny board), the roller which has a motor and the end cap.
The roller itself is actually made up of an alloy tube, the fabric and the alloy capping at the bottom. The fabric is stuck on the roller with a glue. It is actually easy to take off and put back.
The motor is missing in the above pic as this is a blind that I broke whilst trying to work out if I could reverse direction of the blind. Don't let that scare you, as I really got into the guts of the thing, and it went way beyond what I'm going to suggest here.
Before you start:
- Measure the width of the window. If you are going to put the Blind inside the window frame, like I have, this is going to be the width of the frame. If you are going to have the blind running down the outside of the frame, then you need to know that Ikea gives you on their website is the width of the outside of the housing, not the width of the blind. E.g., a Blind that is 58.5cm/23" wide has a fabric width of 54cm/21¼" .
- you purchase the blind that is closest to the width you need.
In my case, I had to reduce the width by about 2cm on the middle blind, and 3cm on the outside blinds. The process is slightly different for those two scenarios.
The end cap is held on with a small screw. As soon as you take that screw out, you can remove the end cap.

When you have removed the endcap you can remove the roller. The motor will stay attached to the main housing.

Now you have the roller out, you will notice that the fabric does not reach the end of the roller. There is about 1cm/0.4" spare at each end. So, my windows that needed just to trim off 2cm/0.8" were easy. Remove the spare at both ends of the roller. Remove 2cm/0.8" off the length of the main housing. Reassemble.... and Bob's your Uncle, or Ethel's your Aunt!
The Centre window needed 3cm/1.2" removed. This meant that I had to remove the actual fabric from the roller, Trim off 1cm/0.4" off the fabric and 3cm/1.2" off the roller and the Metal frame.
To trim the fabric, you have to remove the alloy weight at the end.
You do that by removing the little end cap, which is just push on. You can then slide the fabric out. Trim the fabric, trim the allow weight. Slide the weight back on teh fabric, add the end cap and then reassemble as before.
Tips for Adding Fyrtur to HomeKit.
All of the Ikea smart devices use the Zigbee protocol. Apparently the lights can be added to the Philips Hue Hub, for example. However, that is not the case with the blinds, so you need a Tradfri hub.
I'm not going to go into the whole process of how to add the blinds. I'd say the Ikea app does that very well. What it doesn't tell you is that I had the most success with the blinds, the remote, and the repeater when I added them close to the hub... and then installed them in their final location.
One complaint, is that I can't believe that the Tradfri hub is hardwired only!
After adding the 3 blinds, I created an accessory group in the Dining Room called Blinds, which contains all 3 of the blinds.
I actually have another two in my Study/Home Office which cover the French doors onto the rear deck. They are also grouped together.
Getting Smart with Blinds.
The whole point of adding these blinds is to block sunlight, and thus stop the warming up of the house. However, I only want to do that on a day that is going to be warm. It's no point knowing when it is already warm, as that is too late. I wanted to be pro-active.
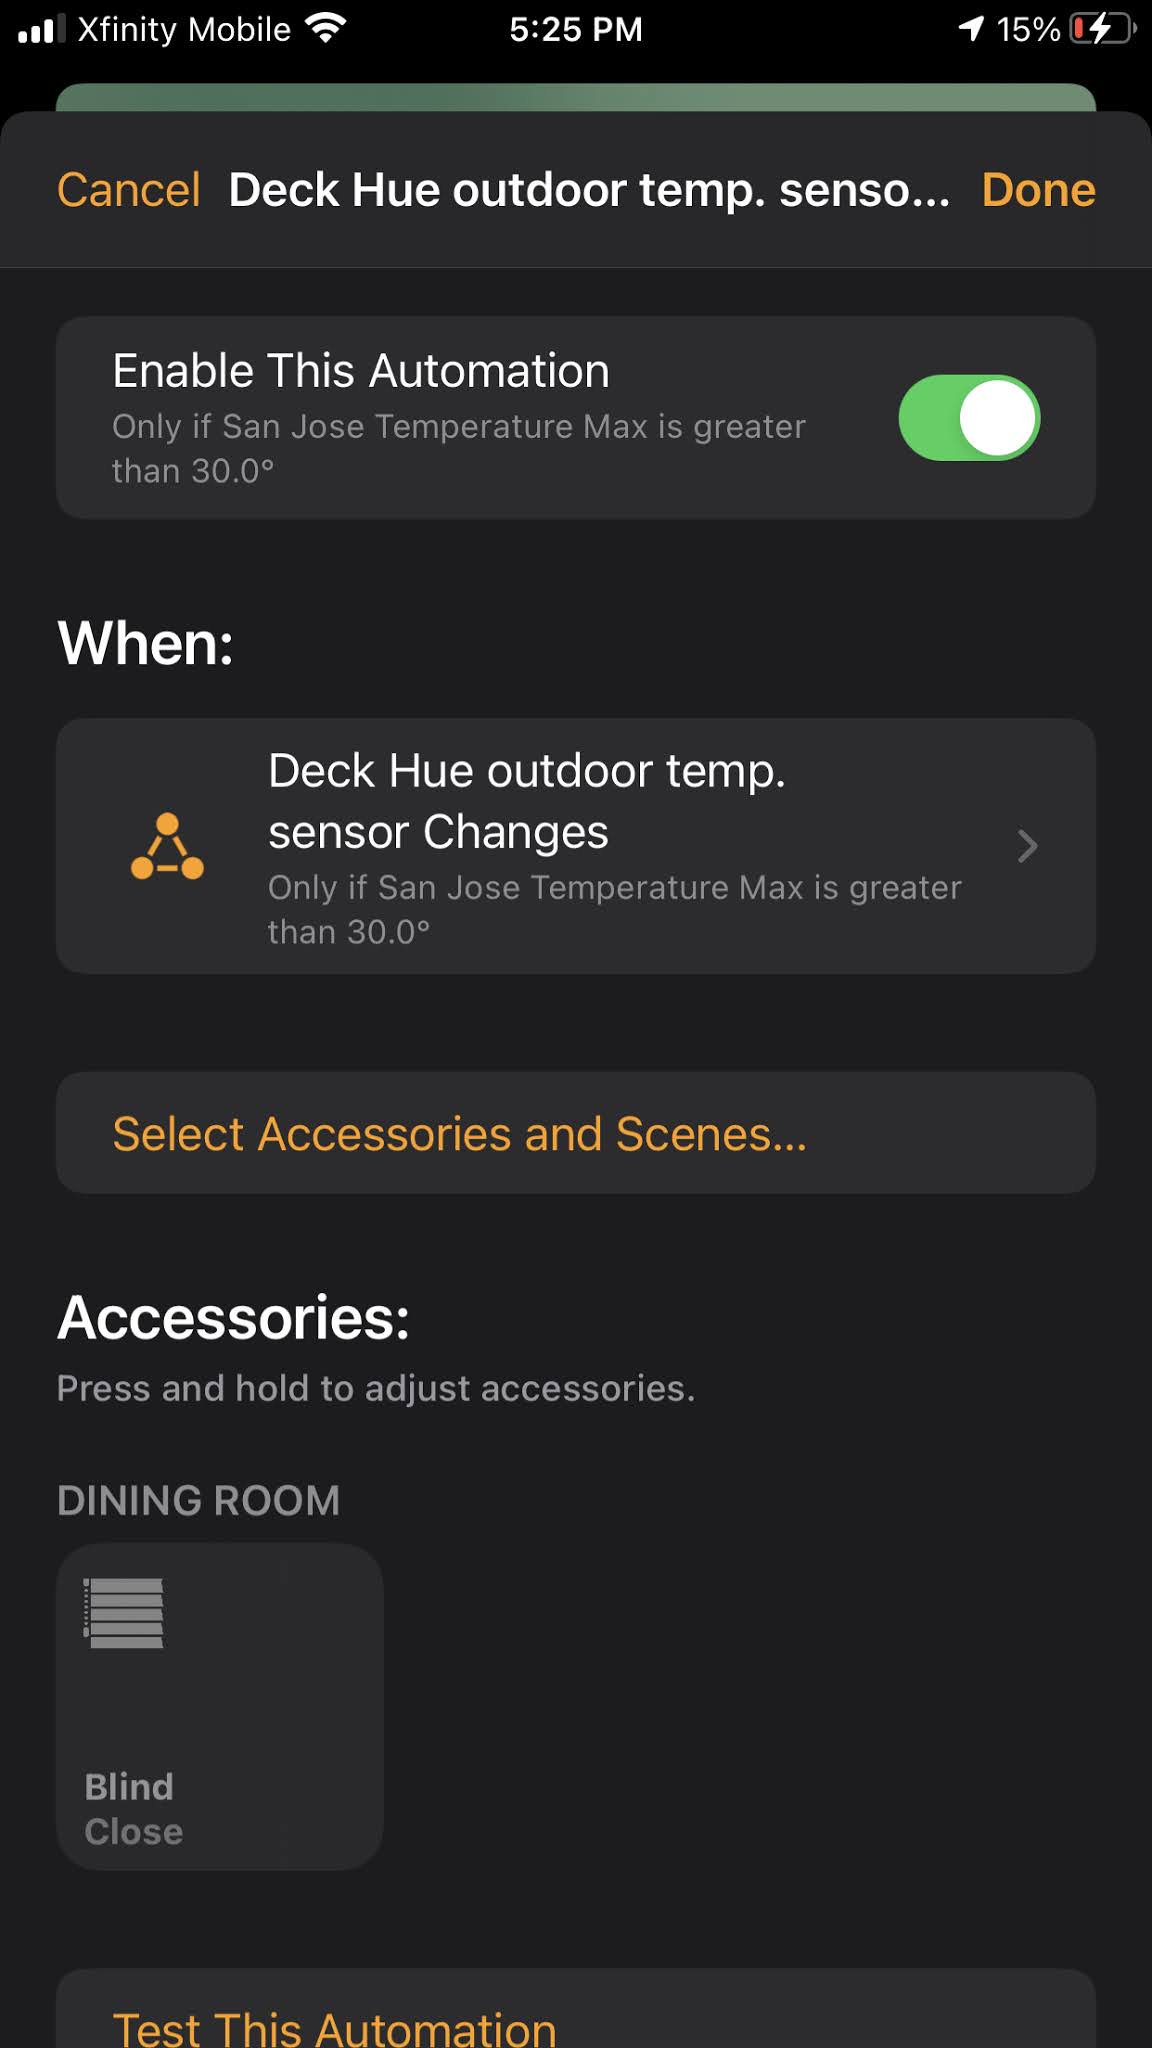
The new Automation <Updated 17th Feb 2021>
I've discovered Shortcuts! Not the normal Shortcuts that is a seperate App you see on your iPhone, but the sneaky Shortcuts you see way down at the bottom of the screen when you are selecting accessories to automate. This is a whole new world for me now. I can't believe I didn't go there before but, I'm going to point the finger at Apple. They've not been very clear bout Shortcuts and I thought they were just personal automations for a device and so unique to an individual. Not these Short cuts.
How do you get there?
First of all you create an automation in the normal way. You can do that from inside the Home App, or actually from inside Shortcuts. You create some kind of trigger, which would be a sensor sensing something, or an accessory being controlled, etc.
Here I tripped over the Home app's inability to actually be able to trigger of a temp sensor. So I created a new automation in my favourite HomeKit Automation app, which I still haven't decided if it is Eve, Home+ or Controller.

I created an Automation that said
IFDeck Temperature Sensor GTE 27CTHEN
Close the Blinds in the Dining Room
ENDIF
This gave me the trigger I needed. You may think I want dto stop there, but actually I only want to drop the blinds if the outside temp max is going to be Greater or Equal to 30C. This is going to take some further refining!
I went back to the Home App, and then edited the Automation 

Then "Select Accessories and Scenes". I unselected the scene, to be deleted later, that had been created by the app and scrolled right to the bottom where:

Selecting this will then take you into creating an actual Shortcut, but these shortcuts are different than those on your devices. These ones will sit inside your home.
You now get to a blank screen.
Let the juices flow!
Although, I must admit, the way the UI works does take a little getting used to.
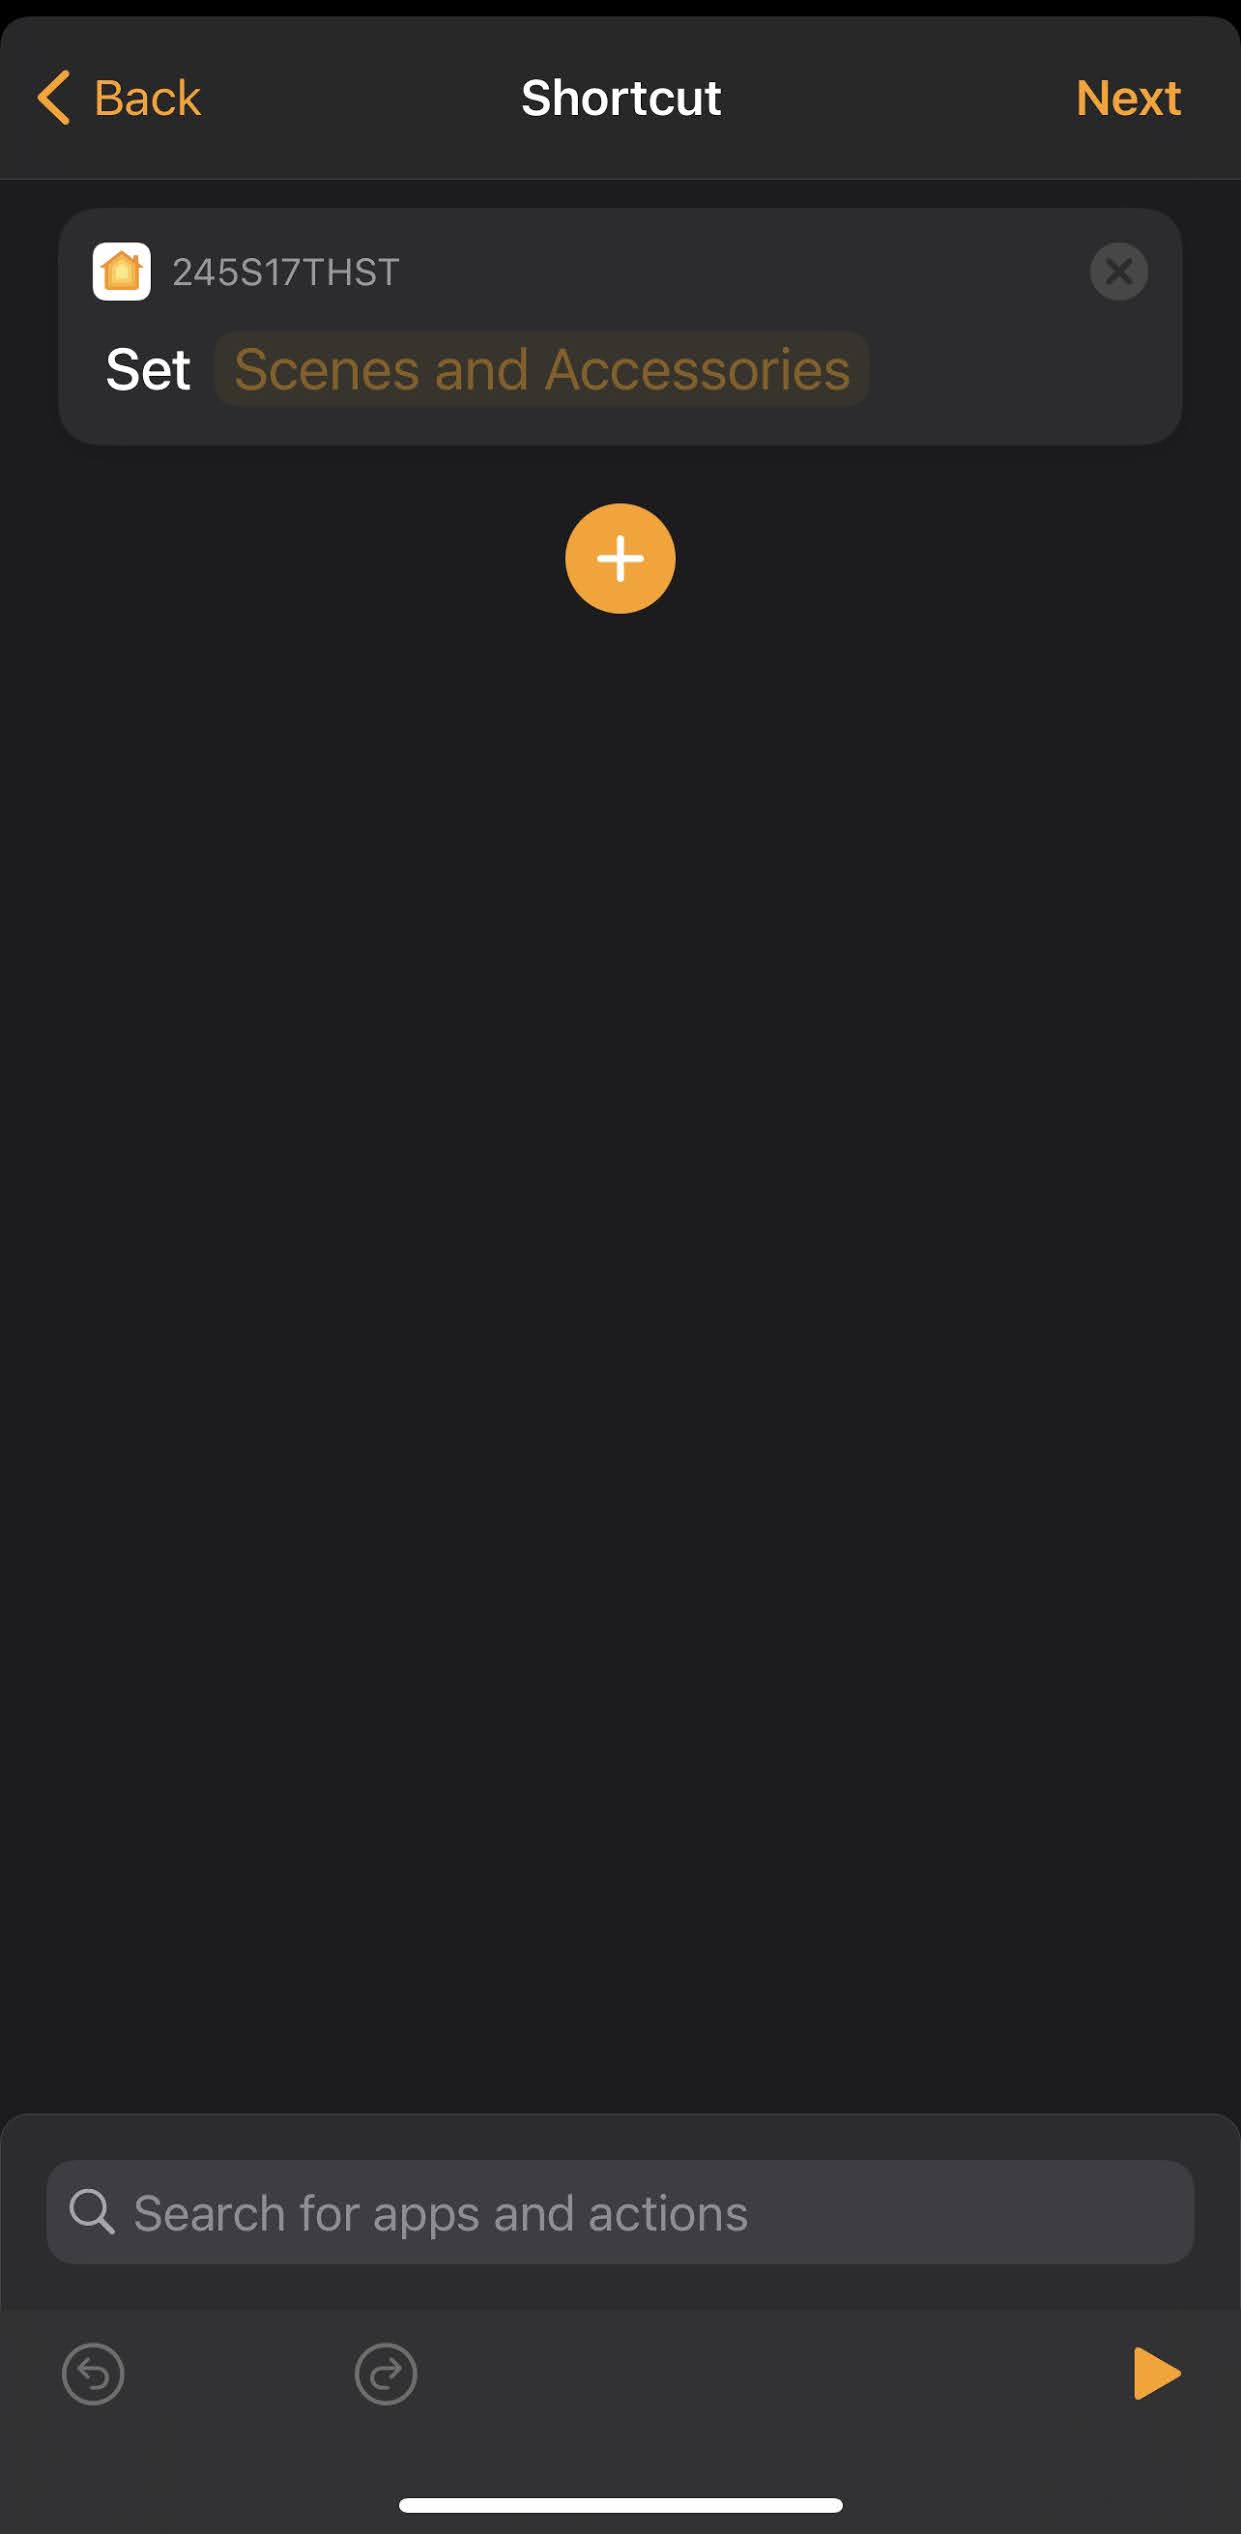
So, First of all I pretended that I was not going to make an IF
I just selected the blinds I wanted to close. I do this by selecting the yellow text "Scenes and accessories" and then selecting the blinds I wanted to close. In this case it was the Dining Room Blinds, and 2 Blinds in the Master Bathroom, all being the South Facing Blinds.


You may be wondering why it says "5 accessories" now, this is because the Dining Room Blinds are actually a group of 3 blinds.
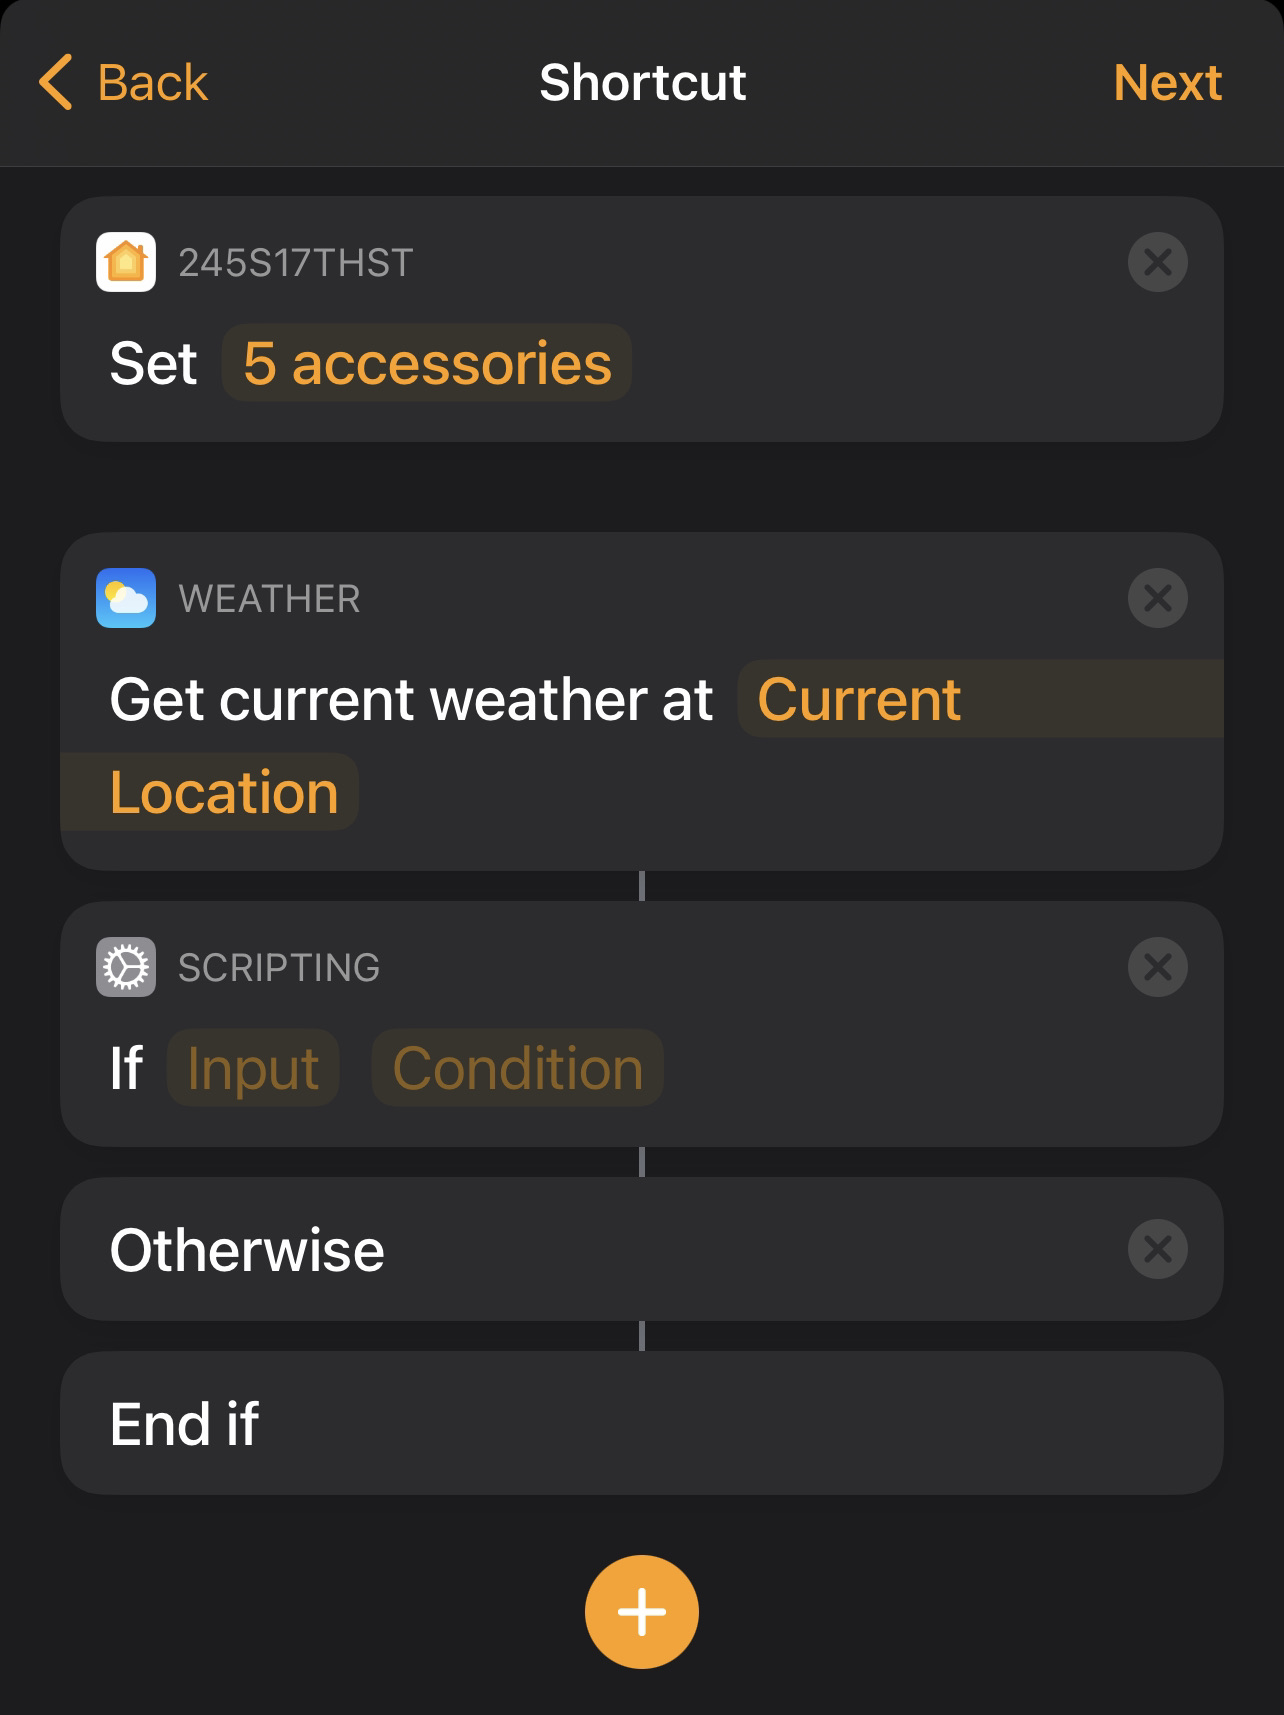
Now we want to make it conditional, but we also need to know the weather.

By selecting the + icon, we get a sub menu, and two of the items are "Get Current Weather" and "If".
First of all select the "Get Current Weather", which returns us to the screen before, press the + icon again, and then select "If":
Now are are on a blow by blow account on how to set this up.

a pop up menu appears and "Select Magic Variable"


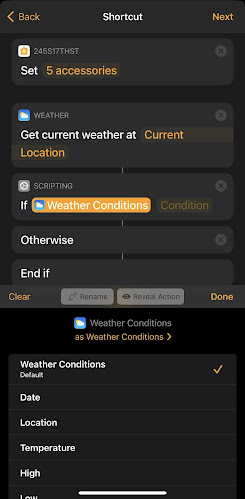


You now select "Condition" and another sub menu appears. In this case, I selected "is greater than or equal to"

and so you end up with this.... which is great... except the "Set" statement is in the wrong place.
Well, you can move things around on the screen.... but you do have to be careful on where you put your finger.
In this case, I found it best to put my finger on the word "Set" and then I could move the statement.
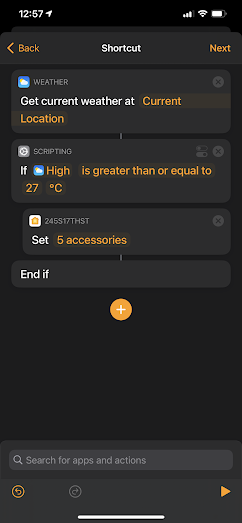
Here you can see the Set statement moved to under the If statement. I have also deleted the "Otherwise" option as I'm not going to do anything.
Then we have "End If"
Select "Next", or you can Run the shortcut if you want, using the Play icon in the bottom right hand corner.

I must admit, considering that I knew the HomePod could get the weather, it confused me why it wasn't an option. This has enabled me to remove this module from Homebridge, simplifying that set up a little more.
The original Automation <no longer used>:
In an earlier post I introduced Homebridge. In that case it was to add functionality I was missing from my LG TV and my Denon AVR. Now we are going to add some real missing functionality.
There is a plugin for homebridge called 'homebridge-weather-plus'. Using the free OpenWeatherMap service, I've set it up to tell me today's forecast, and tomorrows. I also created a room for these called "San Jose" to hold the sensors. What I see in the Home App is a whole bunch of sensors:


OK, so now I know what the maximum temperature will be. However, in early autumn it can still get hot here, but is really cool at night and first thing in the morning.... so the house doesn't really heat up. I need some smarts.
As it happens, as part of another project, I installed a Hue Outdoor Motion Sensor which I installed on my the south side of my rear deck. This tells me the temperature at the moment.
So I have all the components. The only issue is that the Apple Home App does not allow you to do conditional AND statements with two sensors.... even though HomeKit itself actually supports it.
Enter the Eve For HomeKit App. You can also do this with the equally great Home+ App. Personally I use both apps, as I find Eve is good for some things, but Home+ can do some things that Eve can't do. Still, in this case, Eve works.
What I needed is a rule that says:
IF
the Deck temperature is GT or EQ 27C (80.6F)
AND
San Jose Maximum Temperature is GT or EQ 30C (86F)
THEN
Close the Blinds in the Dining Room
END
Now the reason for this is it may be 27C/80.6F outside, but it is always cooler inside. Dropping the blinds slows down the rate of temperature increase inside the house.
This is what the rule looks like inside the Eve app:


You may notice that the Eve app, where it says "Scenes" shows "Custom (Home App)". This is because I didn't want to use a scene. I wanted to just close the blind. I therefore edited the rule in the Apple Home App to Clos the blind. And it looks like this in Home:
This has worked incredibly well and made significant differences to the heat inside the house over the summer months.
However, there were some days where it got quite hot and so I had to automate my ceiling fans, which is the subject of my next post.

Brilliant work.
ReplyDeleteThank you. Appreciate it.
DeleteI've had success reducing some heat buildup during summer (and moisture all year around) by creating a scene that turns on the bath fan when temp, humidity, or air quality levels in our home exceed certain thresholds. I also used the Eve App.
DeleteHave automatic indoor blinds that I got from SP Shutters Australia and it's working perfectly. I think I will upgrade mine using this post. Thanks for this!
ReplyDelete